Showing posts with label cloud. Show all posts

Monday, December 3, 2018

Setting up fn on Kubernetes in the Oracle Cloud (OKE)

In this post I will briefly describe how you can install fn on Kubernetes in the Oracle Cloud (OKE).

Prerequisites

  1. You need to have access to Oracle Cloud Infrastructure (OCI) with a unique account. If you have a federated account, you should create another one to be able to create a kubernetes cluster. This account must have either Administrator privileges or belong to a group to which a policy grants the appropriate Container Engine for Kubernetes permissions. Since my example is for R&D purposes, I will be using an account with Administrator privileges.
  2. Install and configure the OCI CLI, generate an API signing key pair and add that public key to your username. 
  3. Create a separate compartment for the cluster and make sure your compartment has the necessary resources and your root compartments needs the policy Allow service OKE to manage all-resources in tenancy 
  4. Install and setup kubectl on Windowns (tip: use Chocolatey)
  5. Install helm

Create the Kubernetes cluster

  1. Navigate to your console
  2. Under Developer Services, select "clusters"
  3. Pick the compartment that you created or want to use
  4. Click on "Create Cluster" and accept all the defaults
  5. Click "Create"
  6. Inspect the details 
  7. Download the kubeconfig file and store it in your .kube directory
If it fails because of service limits, raise an SR with Oracle support to get your limits increased.

Install fn 

  1. Make sure your server version of helm is up to date (helm init --upgrade)
  2. Create a directory fnhelm
  3. Clone the git repo: git clone https://github.com/fnproject/fn-helm.git
  4. Install the chart dependencies: helm dep build fn
  5. Install it in your cluster: helm install --name my-release fn

Deploy your function to the cluster

  1. Make sure you are logged in to your dockerhub account
  2. Set the fn context to the right value
  3. Deploy the function to the cluster

The fn context

When you use fn deploy, it uses a context to determine where to deploy to, and what registry to use. The URL for the fnserver you deployed to the kubernetes cluster  can be found by issuing the following command

  • $(kubectl get svc --namespace default my-release-fn-api -o jsonpath='{.status.loadBalancer.ingress[0].ip}'):80
However, you can also look it up using a kubectl proxy: 
  • kubectl proxy 
  • Navigate to a browser: https://localhost:8001/api/v1/namespaces/kube-system/services/https:kubernetes-dashboard:/proxy/#
  • Select "Services" in the navigation menu at the left


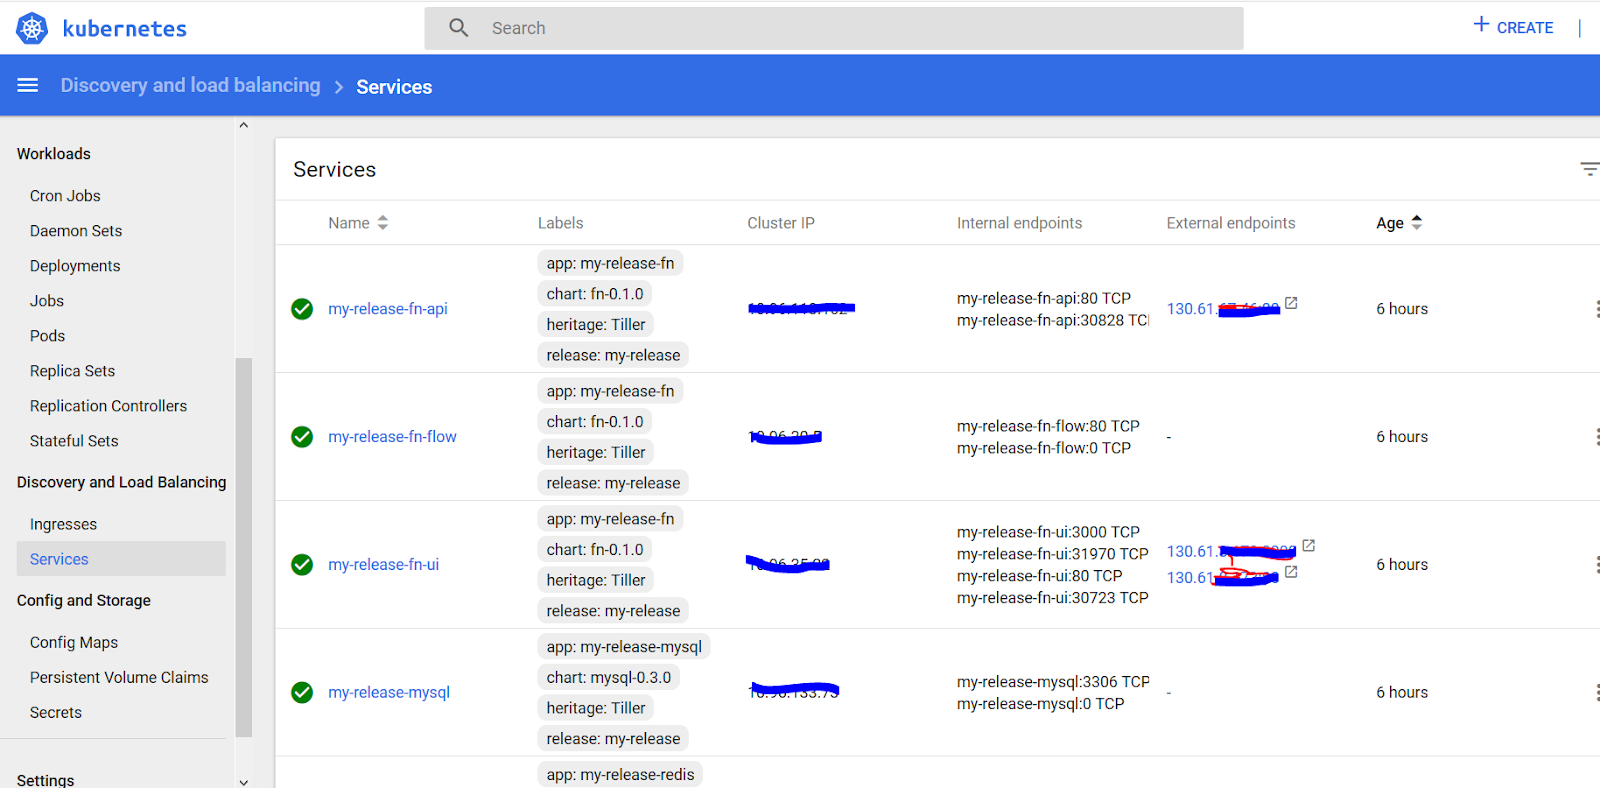
  • Click on the External Endpoint of the my-release-fn-api 
  • You should see the following:
Now we can create the context by running the following commands:
  • fn list contexts
  • fn create context ociLonneke --api-url [your url] --provider default --registry [your_dockerhub_username]
  • fn list contexts

Deploy the function to the cluster

Finally! We are ready to deploy our first function to our cluster. In this case I use the Java tutorial example. 
  • fn init --runtime java --trigger http javafn
  • fn build
  • fn deploy --app java-app
This will result in the following output (or something similar)

Successfully created app:  java-app
Successfully created function: javafn with lonneke/javafn:0.0.2
Successfully created trigger: javafn-trigger
Trigger Endpoint: http://xxx.xx.xx.xx:80/t/java-app/javafn-trigger

Test the function

Open a browser and type the url as stated by the trigger endpoint. You should see the following result:

Next steps

Now you have your kubernetes cluster up and running, you can move your functions from your local installation to the cluster and start using them in production!

Happy coding 😊


Monday, October 2, 2017

My First Blockchain in the Oracle Cloud

Being an integration person I am very interested in Blockchain architecture as an alternative for 'traditional' integration options like 'Enterprise SOA' and Centralized Master Data Management.

This blog will not discuss the architecture of blockchain, but describes how you can get started as a developer with blockchain using Oracle Cloud.

It assumes you have an instance of Oracle Compute Cloud at your disposal and describes how to get started wth MultiChain.

I executed the following steps:
  1. Create two instances of Oracle Compute Cloud
  2. Install MultiChain
  3. Create the first chain

Create two instances of Oracle Compute Cloud

To show the concept of the block chain you need to create at least two nodes. In this case I created two instances of Oracle Compute Cloud Classic. 

  1. Login to your identity domain: cloud.oracle.com
  2. On the Dashboard, select "Create Instance" and pick "Compute Classic"
  3. This gives you an overview as shown in the figure below. First you need to save the private key to be able to access the instance with ssh. 
    1. Type a name for the key
    2. Save it on your computer
  4. Select "Customize"
  5. Finish the Wizard
    1. Select the image "OL_7.2_UEKR4_x86_64"
    2. Select a general purpose shape, unless you are planning to build a real blockchain, then it is recommended to create a High Memory Shape
    3. Add the key you saved to the instance, or upload your own key
    4. For network leave the defaults
    5. Leave defaults in the storage tab 
  6. You can see the result in the orchestrations tab
Orchestration showing the instances that are created


In order to create a chain and have multiple nodes that are aware of each other, you need to make sure the instances can communicate.

To enable this, you need to add a Security Application and a Security Rule for the instances. (Many thanks to Simon Haslam who helped me figure this out!) :

  1. Click on the Network tab in my instances
  2. Select Shared Network
  3. Select Security Application
    1. Create a security Application for te default port
      1. Name: TCP2671
      2. Protocol: TCP
      3. Port start: 2671
      4. Port end: 2671
      5. Description: default Multichain port
    2. Create a security application for the RPC port
      1. Name: TCP2670
      2. Protocol: TCP
      3. Port start: 2670
      4. Port end: 2670
      5. Description: default RPC multichain port
  4. Select Security Rules
  5. Click Add Security Rule
  6. Fill in the fields
    1. TCP2671 for security application
    2. Source: security ip list (public-internet)
    3. Destination: security list (default)
  7. Add another security rule for the default RPC port
    1. TCP2670 for security application
    2. Source: security ip list (public-internet)
    3. Destination: security list (default)


Now you are ready to create the second instance. Note that you don't have to set the security rules for new instances, because they are pointing to the default security list in this case. The new instances are added to that automatically. This is of course not something you would do in real life, but for My First Blockchain in the Oracle Cloud it works fine :) 


Install MultiChain

You need to install MultiChain on all your instances. 

To connect you need a ssh client. I am currently working on a Windows 10 machine, so I use PuTTY. The key that is downloaded from the cloud can't be used directly in PuTTY, you need to import it. 
  1. Open PuTTYgen
  2. Click import key
  3. Browse to the key you just saved to your computer
  4. Click on "Save Private Key"
  5. Open PuTTY
  6. Enter the details of the instance as shown below and save the session
    1. Put in the public IP address of the instance
    2. Point to the SSH private key in the Auth tab
  7. Open a session
  8. Install wget: sudo yum install wget -y
  9. Run the following in the terminal:

cd /tmp
wget https://www.multichain.com/download/multichain-1.0.1.tar.gz
tar -xvzf multichain-1.0.1.tar.gz
cd multichain-1.0.1
sudo mv multichaind multichain-cli multichain-util /usr/local/bin
Repeat this for the second instance and if you are testing with more than one, for all the instances you want to include.

Creating my first chain

Now you are ready to start the tutorial to get acquainted with MultiChain.

In order to keep track of the different servers, I have given the nodes different colors in my PuTTY sessions.

  1. Connect to node 1 and execute the commands that are referenced as 'server1'  in the tutorial in this window
  2. Connect to node 2 and execute the commands that are references as 'server2' in the tutorial in this window
Note that I need to open two windows of PuTTY for server 2: One to start the node:

multichaind chain1@[ip-address]:[port]

And one to start the multichain-cli chain1 interaction. If you don't start the node, you will get an error:

MultiChain 1.0.1 RPC Client


Interactive mode
chain1: getinfo
error: couldn't connect to server
With my two windows open, the interactive client was working like a charm... 


Three windows testing MultiChain from my windows machine


Happy coding!