Monday, October 19, 2020

Updating SSL certificates in Kubernetes on Oracle Cloud

When you secure your servers and APIs, you need SSL certificates. Since they don't last for ever, you will have to update them every year, or every other year.

In OKE (Kubernetes on Oracle Cloud), there are two slightly different ways of doing this, depending on the kind of component you are using. Unfortunately, the Oracle documentation does not describe how to update SSL certificates in Kubernetes. 

Update an Ingress controller 

An ingress that is used for SSL termination looks something like this: 

    apiVersion: networking.k8s.io/v1beta1
    kind: Ingress
    metadata:
      name: my-ing
      annotations:
        kubernetes.io/ingress.class: "nginx"
    spec:
      tls:
      - secretName: my-ssl-secret-name
      rules:
      - http:
          paths:
          - backend:
              serviceName: my-backend-svc
              servicePort: 8088
The Oracle documentation has a clear description of how to setup an ingress controller with TLS. Basically you create an ingress controller and a TLS secret and apply an ingress.yaml.  Note that when you check the load balancer in the OCI console that is associated with the ingress, there is no SSL certificate listed there, this is completely handled from within the Kubernetes cluster.

There is no mention of how to update the certificate but that is actually very simple: you can update the values in the existing Kubernetes secret (for example using the dashboard or a script) and the ingress controller will pick up the new certificate automatically. 

Update a service of type Load Balancer

A service of type load balancer yaml looks something like this: 

kind: Service
apiVersion: v1
metadata:
  name: my-frontend-service
  annotations:
    service.beta.kubernetes.io/oci-load-balancer-ssl-ports: "443"
    service.beta.kubernetes.io/oci-load-balancer-tls-secret: my-ssl-secret-name
spec: selector:
Again, the Oracle documentation has a clear description of how to setup a service with a load balancer.  It describes a similar procedure: you create a service and secret in Kubernetes and apply this. However, because the kind of deployment is a service which specifies a load balancer, the certificate is picked up by the OCI Load Balancer and copied there.

Again there is no mention of how to update the certificate. When you change the value of the certificate in the secret in Kubernetes, the change is not picked up by the OCI Load Balancer. There are a lot of warnings in the documentation not to change it in OCI directly, so that is not an option.  The procedure to update the certificate is:
  1. Create a new secret with a new certificate and private key
  2. Update the service yaml to point to the new secret
  3. Apply the updated service yaml (don't create the service, just apply the updated yaml on the existing service) using kubectl apply -f [name of your yaml]
  4. Delete the previous secret.
To streamline the procedure, we have decided to create a new secret for both the ingress controller and the service so we don't end up with multiple secrets containing the same wildcard certificate and to make sure we can use one procedure for both types of components.

I hope the documentation will be updated by Oracle to include an instruction for updating SSL certificates. In the mean time I hope this post helps you when you need to update your SSL certificates. 

Happy coding! 😀

Wednesday, April 22, 2020

Migrating from Developer Cloud Service classic to Developer Cloud in OCI

One of our customers was still running a Developer Cloud Classic instance. We decided to migrate to Developer Cloud. Since the inception of Oracle Cloud and Oracle Platform as a service, services have moved from "Classic" to "Autonomous" to "Native". What does this mean and why does Oracle have all these different types of services in their cloud? And why would you care? Let's go back in time a little bit.


A history lesson

Oracle started with a Cloud Infrastructure and Platform  (PaaS) and Software services (SaaS) to catch up with competitors like Amazon (AWS) and Microsoft (Azure). Soon after realizing the first generation infrastructure an improvement project was started. This resulted in the current Oracle Cloud Infrastructure (OCI) with compartments, services that can be used by different PaaS services, improved networking etc. At the same time, the first generation of PaaS services was improved, to become "Autonomous": the customer does not have to worry about maintaining the platform, this is done by Oracle. This resulted in products like Oracle Autonomous Data Warehouse  and Autonomous Oracle Integration Cloud. The name "Autonomous" was quickly dropped from most services except Database related products, but the advantage was clear: Oracle manages the platform instances, so customers don't have to worry or worry less about availability, upgrades and patches. A number of these services were not using the new features of the Oracle Cloud Infrastructure.  Oracle released new platform services: so called "native" services that use the networking, compartment, notification and other features of OCI. Note that Autonomous Database products and services like Kubernetes Engine and Function were native from the start.

Still confused? Let's look at an example: Oracle Integration Cloud.

Example: OIC

Integration (also known as Oracle Integration Cloud or OIC) started with Integration Classic. When you provisioned OIC Classic it was provisioned in the Oracle's first generation, or classic, infrastructure. The next generation, which was called Autonomous OIC for a while, is/was running in Oracle Cloud Infrastructure. However, it is not making use of all the native services or functionality that OCI offers: you can't define the compartment it is provisioned in, it does not use the notification services, it does not have Terraform support etc.  It is running in the specifically dedicated ManagedCompartmentForPaaS compartment, that gets automatically created when you provision (non-native) Oracle Integration The latest (and hopefully last) installment is Oracle Integration, which is native. When you provision it, you must create a compartment for it first and it uses all the available services (networking, notification etc.) of Oracle Cloud Infrastructure.

It has several advantages to move to Oracle Cloud Infrastructure native services:

  • Organize cloud resources into a hierarchy of logical compartments.
  • Create fine-grained access policies for each compartment.
  • Support for Terraform for provisioning
  • Usage of Security and network features in Oracle Cloud Infrastructure
  • Last but not least, new features are being added to the native service, not to the non-native services.

Migration of Oracle Developer Cloud Classic


Now that we know how Oracle moves her services, what is the situation for Oracle Developer? Oracle Developer Cloud Classic is provisioned in the classic infrastructure and as a result, uses Oracle Classic infrastructure components for load balancing, networking, storage, etc. There is no native Developer Cloud service (yet?). However, you can move your Developer Cloud  Service Classic to OCI (in the dedicated ManagedCompartmentForPaaS compartment). Developer Cloud service offers different features: a GIT repository, build jobs, deployment jobs, wiki, issue system, to name a few. For a number of these features you need resources. From Developer Cloud Classic you can connect to OCI to use the resources. For example: a build job needs a build VM and storage to store the artifacts. So even though the Developer Cloud Service itself is not running in a compartment of your choice, the jobs you are running and the code you are storing is making use of these features. But Developer Cloud Service itself, also uses networking to give you as a developer access to the console. Think about the load balancer, an IP address etc. For this customer, we wanted to remove all resources from the Classic Infrastructure, we already migrated Mobile Cloud Service to Mobile Hub and API Platform Classic to API Platform. Developer Cloud Classic was the last man standing...

If you are not interested in my experience of the migration, but just want to go ahead and do it, you can find the Oracle documentation here.

We executed the following steps:
  • Create the Developer Cloud instance in OCI
  • Create the storage resource for migration of the project
  • Migrate the project
  • Add the users
  • Remove the Developer Cloud  Classic instance 

Create the Developer Cloud instance in OCI

Because it is not native yet, you can't create the instance using Terraform. The easiest way is to use the user interface:
  • Login to OCI
  • Select "Developer Cloud" from Platform Services
  • Enter the name you want to use 
  • Add a description and some tags (optional)
  • Confirm 

You can now create the organization properties, by copying them from the Developer Cloud Classic instance or create your project using new properties (which what we did).

If you are planning to create build jobs in the future (which we are planning for Kubernetes), you need to make a connection to OCI from Developer CS.

Now we have our Developer Cloud setup, it is time to migrate the stuff from the old instance.

Create storage resource

The first thing to do when you want to export and import the git repository, is to setup an OCI Object Storage bucket to host the data from the exported project. You can use a common container for all projects, but we recommend keeping separate storage buckets per project.

To avoid mistakes and make sure we have consistent naming conventions, we use Terraform scripts to create resources. You can find the documentation here.

Note: you can skip all the optional fields mentioned, all you need is the compartment_id, the bucket_name and the bucket_namespace.

We will use a compartment we created for this purpose: DEVCS compartment, and the user, devcs.user with a public and private key, the group and the policies. For more information, see the documentation. Note that in the documentation, separate users and groups are setup for both managing the resources from Developer Cloud Service and reading and writing the data from the storage resource to manage the import and the export. In our case, it did not add much value to have separate users and policies, so we reused the devcs.user for this purpose. This means we din't add the policies because devcs.user can already manage all resources in the compartment.

Move the git repository

We are now ready to move our git repository.  We will migrate the entire project that the git repository is part of.
  • Export your project. You find extensive documentation here.
  • Import the data into a new project. You find extensive documentation here.
    • Create project
    • Import project
  • Add users (those are not migrated, unfortunately)
Please make sure you add users to the application role DEVELOPER_USER of the new Developer Cloud Instance in IDCS first. This is a bit hidden in the documentation. Please note that users who have accounts that are locked can't be added to the project. You have to unlock them first. This often occurs because some tool like SourceTree poll the repository. If the password has expired, this leads to a locked account.

Alternative

Because in our case, we only had a git repository we wanted to migrate, the alternative would have been to skip the export/import step and simply create a new remote git repository in the new project of the new instance and then push the code to that remote.

How to do that is described here

So, what is the preferred method? After executing the steps above my recommendation is:
  • If you only have a git repository and no Wiki, Jira or build jobs you need to import just create a new project and a new remote git repository
  • If you have build jobs, Wiki pages, Jira issues that you want to keep, use the import/export methodology described in this blog post.

Remove the Developer Cloud Classic instance 

Now that we are done and have the new project up and running, we need to clean up the old instance. The documentation describes how to do that here.

Happy coding 😀

Friday, September 20, 2019

Upgrade your kubeconfig in Oracle Cloud Infrastructure to version 2.0.0

On September 16th, Oracle sent out a notification about a change that needs action before November 15th 2019: you need to upgrade your kubeconfig file from version 1.0.0 to version 2.0.0

Unfortunately, the links in the mail don't describe how to upgrade it, just how to download it....

So here is a short blog that describes what I did on my machine to upgrade my kubecofig file.

Update the config file

  1. open a command window
  2. type oci -v
  3. If the version is 2.6.4 or higher, you are fine. Otherwise type: pip install oci-cli --upgrade Take a look at this page if you encounter issues: Upgrading the CLI
  4. type oci ce cluster create-kubeconfig --cluster-id [your cluster ocid] --file $HOME/.kube/config --region [your region] --token-version 2.0.0 

The response should be:

Existing Kubeconfig file found at C:\Users\ldikmans/.kube/config and new config merged into it

Test the new config

Please make sure you test your configuration by starting your proxy and open a browser that points to it:


  1. Open a command window
  2. Type kubectl proxy
  3. Open a browsser window
  4. Add the URL: http://localhost:8001/api/v1/namespaces/kube-system/services/https:kubernetes-dashboard:/proxy/#!/login
  5. Select your updated kubeconfig file

Fix problems


If you get the error "Not enough data to create auth info structure." ,  follow these steps:

  1. open a command prompt
  2. type kubectl get secrets -n kube-system
  3. type kubectl describe secret -n kube-system kubernetes-dashboard-token-jjtzg (or whatever your dashboard service account user has as a token)
  4. copy the resulting token
  5. open the browser 
  6. Add the URL: http://localhost:8001/api/v1/namespaces/kube-system/services/https:kubernetes-dashboard:/proxy/#!/login
  7. Select "Token"
  8. Paste the token you copied in step 4 in the field for token
When the dashboard opens properly, store the token in a file so you can copy it in the next time.

Now you are all set!

Happy coding 😀


ps: I would have been nice if this instruction was in the mail Oracle sent. Unfortunately it points to a link that contains the regular installation that does not explain it will merge it automatically. The good news is it was easier than it looked!

ps2: I think you should be able to store the token in the config file as well. However, so far I did not manage to make this work in my environment.

Sunday, September 15, 2019

Building a docker image and pushing it to the Docker hub using Oracle Developer Cloud

Oracle Developer Cloud offers some powerful features to automate your build and deployment process to support CI/CD (continuous integration/ continuous delivery)
The nice part is that you don't have to use the Oracle docker registry or git repository (although you can of course), you can use Github repositories and Docker hub.

This post describes how I built and pushed my docker image with a node.js backend to docker hub, fetching the code from Github.

Prequisites

You need the following to follow the steps in this blog:
  1. Github account with a repository containing an application. Note that you could also build any type of docker image, but my examples I assume node.js
  2. Docker hub account that can store your images
  3. Oracle Cloud tenancy that you are administrator of the OCI part
  4. A Developer cloud instance setup with your OCI details (see Dev CS documentation)

Setup your VM template and create Build VM

The build VM that you will use for this, needs to be able to build docker. So you need to create a new VM template with the following software installed on it:

  • Go to "Organization" and click on "Virtual Machine Templates"
  • Click on "Create Template"
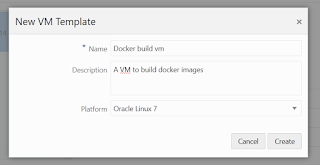
  • Put a name and a description and select Linux 7
  • Click "Create"


  • Click on "Configure Software"

  • Select "Docker 17.2"
  • Click on "Done"
You now have a VM template. This template will be used to create your build VM
  • Click on Build Virtual Machines
  • Click on "Create VM"
  • Select the quantity (1), the template you just created,  the region you want the VM to be in and the shape of the VM you need (in my case I used VM Standard 1.1)
  • Click Add
You now have a build VM that can be used to build docker images and push them to docker hub (or the OCI registry)

Setup your docker repository

Because we are not pushing to the Oracle Registry but to Docker hub, you have to setup your docker registry link:
  • Click on "Project Administration"
  • Click on "Repositories"
  • Click on "Link External Docker Registry"
  • Put the name of your registry (lonneke in my case)
  • Put the link of the docker hub. Please note you have to put "https://registry-1.docker.io/"
  • Write a description and enter your username and password
  • Click "Create"
You can check the link by going to the "Docker" tab in your project. It should list your current repositories in your docker hub account.


Define the build job

Now that we have done the setup, we can define the build job. We will define a job that will checkout the code from github, build the docker image, login to docker and then pushes it to docker hub.

Create job

First we need to create a job
  • Click Create Job
  • Put the name of the job (build shipment-backend-ms for example)
  • Select the template we just created

Configure Git

Now we configure git, so the right code gets checked out.
  • Put the repository link that you can copy from github (https://github.com/ldikmans/blockchain-shipping-soaring-clouds-sequel.git) 
  • Optionally put the branch (develop)
  • Click Save

Define Build image

  • Click on Steps
  • Select "Docker" from the dropdown in steps and select "Docker build"
  • Select the registry host you define before when you created the external link
  • Put the image name and optionally a version tag
  • Put the context root (in my case shipping/backend/src/node) where you want the docker image to be built from
Now we add the login step to be able to push to the registry
  • Click on "Add Step"
  • Select "Docker" from the drop down and select "Docker login"
  • Select the registry host from the drop down that we just created
  • Put the username and password that needs to be used
Last but not least we push the image to docker hub:
  • Click on "Add Step"
  • Select "Docker" from the drop down and select "Docker push"
  • Select the registry host you define before when you created the external link
  • put the same name and image tag as you did in the build step
  • Click save
We are now ready to run the build

Run the build job

Go to the build overview and select your job
  • click on "build now"
  • After a while the build will start. The first time it can take a bit longer because the VM needs to be started
  • Once the build is started, you can follow the progress by Clicking on "Build log
Once the build is done, you can check the images by clicking on "Docker" in the project. Your new image should be listed!
Now the next step is that we run a build every time we do a merge request to develop and deploy the image to kubernetes using the build jobs. I will save that for some other time

Happy coding 😀

Tuesday, August 27, 2019

Deploy Oracle Blockchain SDK on Oracle Cloud Infrastructure

[EDITED JUNE-18-2020, UPDATE TO INSTALL DOCKER, WITH SPECIAL THANKS TO MATHIJS KEMP]

In my previous post I described how to write a chaincode for Oracle Blockchain Cloud Service. Sometimes you don't have access to the blockchain cloud service, or you want to test your blockchain locally without deploying it to your production instance.

For that use case, there is good news: you can deploy it on Oracle Cloud Infrastructure.

To make this work you need to do the following:

  1. Create a compartment for your blockchain (for example SDKBLOCKCHAIN)
  2. Create a public/private key pair
  3. Create a VCN 
  4. Create a compute instance
  5. Install docker
  6. Build the SDK
  7. Create blockchain instance (founder)

Create the VCN

see https://docs.cloud.oracle.com/iaas/Content/Network/Tasks/managingVCNs.htm for a detailed explanation of this service in Oracle Cloud Infrastructure.

For this purpose, we create a VCN and related resources. 

create VCN dialog in Oracle Cloud Infrastructure


Next we open up the ports for this VCN so the blockchain console ports are accessible from the internet

  • Click on security lists
  • Click on the default security list
  • Make sure the provisioning page is accessible from the internet by opening port 3000
  • Make sure that 500 ports are accessible from the internet (the blockchain SDK will take up to 500 ports)
Ingress rule for ports of Blockchain Console


The list of rules should look like this:

List of Ingress rules for SDK VCN


Create the Compute instance

Create a compute instance that complies with the following values:

AttributeValueRemark
Linux Version7.3or higher
Linux kernel3.10or higher
RAM4GBor higher
Storage30GBbuild.sh -d <> >=12GB Ensure there's enough space to unpack the package.Workspace
build.sh -w [] >=5GB Workspace is relating to the transaction
volume. For a clean installation, at least 5G of free space is
recommended./var/lib >=10GB For a clean installation, Oracle
Blockchain Platform SDK Docker images consume approximately 8GB /var/lib
space.
CPU2or higher
hostname[compute instance].[subnet].[dns vcn]internal FDQN
IPxxx.xx.xx.xxxpublic IP of your instance

Set the timezone TZ variable

Make sure that you set the TZ variable in your profile, otherwise you will get an error when provisioning the blockchain instance.

  • vi .bash_profile file
  •  Add  TZ='Europe/Amsterdam'; export TZ to the file
  • Save and quit (wq)
  •  Log out
  • Log in

Disable the firewall


Check if the firewall is running: sudo firewall-cmd --state
running
If it is running, stop it:
sudo systemctl disable firewalld
run the command again: sudo firewall-cmd --state
not running

You can of course update the firewall instead of disabling it, I was too lazy to type that up today 😁

Install Docker

  1. Execute the following commands to install some required packages:

    sudo yum install -y https://dl.fedoraproject.org/pub/epel/epel-release-latest-7.noarch.rpm
    sudo yum install -y yum-utils device-mapper-persistent-data lvm2
  2. Add the repository

    sudo yum-config-manager --add-repo https://download.docker.com/linux/centos/docker-ce.repo
  3. Install the docker community edition

    sudo yum install docker-ce docker-ce-cli containerd.io
  4. Start docker and enable the start of docker on boot

    sudo systemctl enable --now docker.service
  5. Check the version of docker

    sudo docker version

    Run hello world to see if docker is installed correctly

    docker run hello-world


Build the Instance

Now we are ready to install the SDK

  • Download it from the Oracle website 
  • Unzip to /usr/local/bcssdk
  • Run sudo ./build.sh  This will run it with all the default:

OptionAttributeValue
-dpackage directory/usr/local/bcssdk
-wprovision workspace directory~/obcs_worksapce
-pprovision console port3000

Create Instance


  • Open the console: http://[IP ADDRESS]:3000
  • Chose a username and password for your provisioning application and click ok
  • This opens the console and you can create a founder with the following attributes:
AttributeValue
Instance namename you picked
host nameinternal FQND
start portport you opened in ingress
founderyes
authorizationyes

The username password will be set to admin/Welcome1 when you check the "Authorization" box. The result can be seen below

Picture shows the values of the created instance
Provision instance after building the SDK

Finally

Click on the name. This will open a browser, but it will say "not found". Replace the FQDN with the IP address, and leave the port.

When you do that, it warns about the certificate. Accept that and it prompts for username password.
Login using admin/Welcome1 and you will see your blockchain console!

http://[IP ADDRESS]:21003

Blockchain console after creating the instance


Happy coding 😀

Saturday, March 30, 2019

Oracle BlockChain Service: creating a smart contract aka how to write a chaincode

In the first blog about blockchain, I used Oracle Compute Cloud Classic and installed MultiChain on it. Since then, Oracle has released a Blockchain Cloud Service with a lot of out of the box functionality, based on Hyperledger.

In this blog post I will describe how to create a smart contract for a webshop use case: getting offers from different suppliers for a specific order. I already know node.js so I will write the ChainCode in node. Note that go is also supported.

Prerequisites

  • A running instance of Oracle Blockchain Service
  • Node.js installed on your laptop
There are a number of steps involved in writing a smart contract (or chaincode).
  1. Design the chaincode
  2. Write a chaincode (in Node)
  3. Deploy a ChainCode to a Peer 
  4. Test the chaincode with Postman

Design 

Before you write a chaincode, you need to know what transactions need to be supported. In our example we have a webshop, that issues requests for shipping after ordering an item. Shippers can create an offer. If they are selected by the customer, they pickup the shipment. The customer receives the goods at the end of the cycle. For more information about designing the chaincode, see the hyperledger documentation


Write a ChainCode

The easiest way to write the chaincode is to download an example from the Oracle BlockChain Service and modify it.

  1. Navigate to the Blockchain console and click on Developers tools.
  2. Click on Download oracle samples
  3. Download the Cardealer sample and unzip it
  4. Navigate to [yourpath]\CarDealer\artifacts\src\github.com\node and copy cardealer_cc
  5. Paste the cardealer_cc in a new folder where you want to store your code and rename it to shipment_cc
  6. Leave the methods Init and Invoke as is and create methods to issue, offer, select, pickup and receive a shipment. 

        ---------------code snippet--------------------------------
        shipment.orderId = args[0];
        shipment.product = args[1].toLowerCase();
        shipment.customer = args[2].toLowerCase();
        shipment.shippingAddress = args[3];
        shipment.orderDate = parseInt(args[4]);
        if (typeof shipment.orderDate !== 'number') {
            throw new Error('5th argument must be a numeric string');
        }
        shipment.custodian = args[5].toLowerCase();
        shipment.currentState = shState.ISSUED;
        shipment.offers = [];

        // ==== Check if shipment already exists ====
        let shipmentAsBytes = await stub.getState(shipment.orderId);
        if (shipmentAsBytes.toString()) {
            console.info('This shipment already exists: ' + shipment.orderId);
            jsonResp.Error = 'This shipment already exists: ' + shipment.orderId;
            throw new Error(JSON.stringify(jsonResp));
        }

        // ==== Create shipment object and marshal to JSON ====
        let shipmentJSONasBytes = Buffer.from(JSON.stringify(shipment));

        // === Save shipment to state ===
        await stub.putState(shipment.orderId, shipmentJSONasBytes);


        -------------end code snippet --------------------------

Deploy the chaincode

After writing the chaincode, it needs to be deployed to the blockchain. In this example we will deploy it to the shipment channel using the quick start. This will instantiate it and use the default endorsement policy. Please note that channels and chaincodes can't be deleted after creating and deploying them.

  1. Zip the code and the package.json in a zip
  2. Click on "Deploy a new Chaincode" in the chaincode menu in the blockchain console.
  3. Click on Quick Deployment
  4. Fill out the right details


  5. Upload the zipfile and wait until the dialog shows that the chaincode is instantiated and deployed succesfully. 
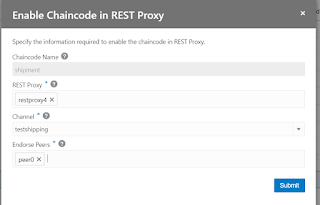
  6. Enable the rest proxy by going to the chaincode and clicking on the hamburger menu. Click on "Enable on REST Proxy". 
  7. Fill out the fields as shown in the figure below

Test the chaincode

Now that we have deployed the chaincode, we can test it using the REST proxy. Before you do this, make sure you have the right role associated with your user (RESTPROXY4_USER)
  1. Open postman
  2. Create a new "Post request" to issue a shipment
  3. Go to the blockchain console and find the URL that is listed for the RESTProxy that you enabled for your chaincode
  4. Create a request that looks as follows: 
curl -X POST \
      https://restserver:port/restproxy4/bcsgw/rest/v1/transaction/asyncInvocation \
        -H 'Authorization: Basic xxx' \
          -H 'Content-Type: application/json' \
            -H 'cache-control: no-cache' \
              -d '{
              "args":[1,"iron","John Doe","Rembrandtlaan 22c Bilthoven","0330","webshop"],
                "channel": "testshipping",
                  "chaincode": "shipment",
                    "chaincodeVer":"1.0",
                      "method": "issueShipment"
                        }'

                        The result should like this:


                        {
                            "returnCode": "Success",
                            "txid": "a4f5e851734f7e3ebdfa0761bfd54bab090cdaf08266363fe2451eacc3a14826"
                        }

                        Next steps

                        You can now query the result of this transaction, read the shipment etc.

                        Happy coding! 😃

                        Monday, January 21, 2019

                        Another blockchain: installing Ethereum on Oracle Cloud

                        After installing MultiChain on Oracle Compute Cloud, and playing around with HyperLedger on the Oracle Blockchain Cloud service, I now ran into a case where Ethereum was used.

                        This blog post describes how I installed a Ethereum node on Oracle Cloud Infrastructure.

                        Prerequisites

                        • An account on Oracle Cloud with Administrator rights
                        • You have generated an ssh key-pair
                        • You are logged in to your cloud account

                        Create Compartment

                        Create a compartment with the name Ethereum to separate this from your other infrastructure. You can find this under "Identity".

                        Create a Virtual Cloud Network

                        1. Navigate to Virtual Cloud Network, by selecting Network from the Menu
                        2. Select the compartment you just created
                        3. Click "Create Virtual Cloud Network"
                        • The compartment will default to the compartment you just selected
                        • Name: ethereum-network
                        • select "Create Virtual Cloud Network plus related resources" to quickly get up and running
                        • Click "Create"
                        A dialog is displayed that shows you what has been created, after a few seconds.

                        Create compute nodes

                        For this example I will create 3 nodes on 3 separate VMs.
                        1. Go to the Compute Menu
                        2. Select "Ethereum" in the compartment dropdown (left side of the menu)
                        3. Click Create Instance
                        4. Give the instance a name (ethereum-node1 for example)
                        5. Leave all the defaults for shape and OS
                        6. Upload your public key
                        7. Select the networking you created (ethereum-network)
                        8. Click "Create"
                        Repeat this process for 2 more nodes (giving them separate names of course).

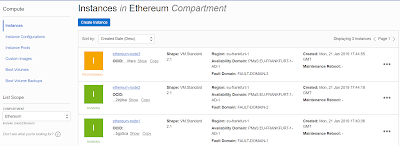
                        You should have three nodes now, like the picture below shows. It might take a couple of minutes before they are completely done, but not longer than 5 minutes.


                        You can connect to your instance as "opc" using the private key and the public IP address that is published in the console.

                        Install Ethereum

                        To install Ethereum for Oracle Enterprise Linux, you have to install it from source. There is no package available.

                        You need git, go and gcc. The easiest way is to install development tools

                        • sudo /usr/bin/ol_yum_configure.sh
                        • sudo yum update
                        • sudo yum groupinstall 'Development Tools'
                        • sudo yum install gettext-devel openssl-devel perl-CPAN perl-devel zlib-devel
                        • sudo yum install curl-devel

                        Install git

                        • sudo wget https://github.com/git/git/archive/v2.10.1.tar.gz -O git.tar.gz
                        • tar -zxf git.tar.gz
                        • cd git-2.10.1/
                        • make configure
                        • ./configure --prefix=/usr/local
                        • sudo make install
                        • git --version to check the installation

                        Install go

                        • cd ~
                        • wget https://dl.google.com/go/go1.11.4.linux-amd64.tar.gz
                        • sudo tar -C /usr/local -xzf go1.11.4.linux-amd64.tar.gz
                        • add go to your path by editing .bash_profile
                        • go version to check the installation

                        Install geth

                        To create the private network, we need to install geth, the command line tool that runs a ful Ethereum node implemented in Go. It offers three interfaces: 
                        1. the command line subcommands and options
                        2. a Json-rpc server
                        3. An interactive console
                        Execute the following commands
                        • cd ~
                        • git clone https://github.com/ethereum/go-ethereum
                        • cd go-ethereum
                        • make geth
                        • add build/bin to your path by editing your .bash_profile

                        Start the node

                        You can start a node by running build/bin/geth. This will add this node to the public ethereum network. This node is now part of the Ethereum network.


                        If you don't want to be part of the public network, you can also create a private network. https://github.com/ethereum/go-ethereum/wiki/Private-network.


                        Happy coding 😊