Friday, September 20, 2019

Upgrade your kubeconfig in Oracle Cloud Infrastructure to version 2.0.0

On September 16th, Oracle sent out a notification about a change that needs action before November 15th 2019: you need to upgrade your kubeconfig file from version 1.0.0 to version 2.0.0

Unfortunately, the links in the mail don't describe how to upgrade it, just how to download it....

So here is a short blog that describes what I did on my machine to upgrade my kubecofig file.

Update the config file

  1. open a command window
  2. type oci -v
  3. If the version is 2.6.4 or higher, you are fine. Otherwise type: pip install oci-cli --upgrade Take a look at this page if you encounter issues: Upgrading the CLI
  4. type oci ce cluster create-kubeconfig --cluster-id [your cluster ocid] --file $HOME/.kube/config --region [your region] --token-version 2.0.0 

The response should be:

Existing Kubeconfig file found at C:\Users\ldikmans/.kube/config and new config merged into it

Test the new config

Please make sure you test your configuration by starting your proxy and open a browser that points to it:


  1. Open a command window
  2. Type kubectl proxy
  3. Open a browsser window
  4. Add the URL: http://localhost:8001/api/v1/namespaces/kube-system/services/https:kubernetes-dashboard:/proxy/#!/login
  5. Select your updated kubeconfig file

Fix problems


If you get the error "Not enough data to create auth info structure." ,  follow these steps:

  1. open a command prompt
  2. type kubectl get secrets -n kube-system
  3. type kubectl describe secret -n kube-system kubernetes-dashboard-token-jjtzg (or whatever your dashboard service account user has as a token)
  4. copy the resulting token
  5. open the browser 
  6. Add the URL: http://localhost:8001/api/v1/namespaces/kube-system/services/https:kubernetes-dashboard:/proxy/#!/login
  7. Select "Token"
  8. Paste the token you copied in step 4 in the field for token
When the dashboard opens properly, store the token in a file so you can copy it in the next time.

Now you are all set!

Happy coding 😀


ps: I would have been nice if this instruction was in the mail Oracle sent. Unfortunately it points to a link that contains the regular installation that does not explain it will merge it automatically. The good news is it was easier than it looked!

ps2: I think you should be able to store the token in the config file as well. However, so far I did not manage to make this work in my environment.

Sunday, September 15, 2019

Building a docker image and pushing it to the Docker hub using Oracle Developer Cloud

Oracle Developer Cloud offers some powerful features to automate your build and deployment process to support CI/CD (continuous integration/ continuous delivery)
The nice part is that you don't have to use the Oracle docker registry or git repository (although you can of course), you can use Github repositories and Docker hub.

This post describes how I built and pushed my docker image with a node.js backend to docker hub, fetching the code from Github.

Prequisites

You need the following to follow the steps in this blog:
  1. Github account with a repository containing an application. Note that you could also build any type of docker image, but my examples I assume node.js
  2. Docker hub account that can store your images
  3. Oracle Cloud tenancy that you are administrator of the OCI part
  4. A Developer cloud instance setup with your OCI details (see Dev CS documentation)

Setup your VM template and create Build VM

The build VM that you will use for this, needs to be able to build docker. So you need to create a new VM template with the following software installed on it:

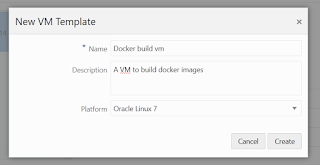
  • Go to "Organization" and click on "Virtual Machine Templates"
  • Click on "Create Template"
  • Put a name and a description and select Linux 7
  • Click "Create"


  • Click on "Configure Software"

  • Select "Docker 17.2"
  • Click on "Done"
You now have a VM template. This template will be used to create your build VM
  • Click on Build Virtual Machines
  • Click on "Create VM"
  • Select the quantity (1), the template you just created,  the region you want the VM to be in and the shape of the VM you need (in my case I used VM Standard 1.1)
  • Click Add
You now have a build VM that can be used to build docker images and push them to docker hub (or the OCI registry)

Setup your docker repository

Because we are not pushing to the Oracle Registry but to Docker hub, you have to setup your docker registry link:
  • Click on "Project Administration"
  • Click on "Repositories"
  • Click on "Link External Docker Registry"
  • Put the name of your registry (lonneke in my case)
  • Put the link of the docker hub. Please note you have to put "https://registry-1.docker.io/"
  • Write a description and enter your username and password
  • Click "Create"
You can check the link by going to the "Docker" tab in your project. It should list your current repositories in your docker hub account.


Define the build job

Now that we have done the setup, we can define the build job. We will define a job that will checkout the code from github, build the docker image, login to docker and then pushes it to docker hub.

Create job

First we need to create a job
  • Click Create Job
  • Put the name of the job (build shipment-backend-ms for example)
  • Select the template we just created

Configure Git

Now we configure git, so the right code gets checked out.
  • Put the repository link that you can copy from github (https://github.com/ldikmans/blockchain-shipping-soaring-clouds-sequel.git) 
  • Optionally put the branch (develop)
  • Click Save

Define Build image

  • Click on Steps
  • Select "Docker" from the dropdown in steps and select "Docker build"
  • Select the registry host you define before when you created the external link
  • Put the image name and optionally a version tag
  • Put the context root (in my case shipping/backend/src/node) where you want the docker image to be built from
Now we add the login step to be able to push to the registry
  • Click on "Add Step"
  • Select "Docker" from the drop down and select "Docker login"
  • Select the registry host from the drop down that we just created
  • Put the username and password that needs to be used
Last but not least we push the image to docker hub:
  • Click on "Add Step"
  • Select "Docker" from the drop down and select "Docker push"
  • Select the registry host you define before when you created the external link
  • put the same name and image tag as you did in the build step
  • Click save
We are now ready to run the build

Run the build job

Go to the build overview and select your job
  • click on "build now"
  • After a while the build will start. The first time it can take a bit longer because the VM needs to be started
  • Once the build is started, you can follow the progress by Clicking on "Build log
Once the build is done, you can check the images by clicking on "Docker" in the project. Your new image should be listed!
Now the next step is that we run a build every time we do a merge request to develop and deploy the image to kubernetes using the build jobs. I will save that for some other time

Happy coding 😀