Showing posts with label blockchain. Show all posts

Saturday, March 30, 2019

Oracle BlockChain Service: creating a smart contract aka how to write a chaincode

In the first blog about blockchain, I used Oracle Compute Cloud Classic and installed MultiChain on it. Since then, Oracle has released a Blockchain Cloud Service with a lot of out of the box functionality, based on Hyperledger.

In this blog post I will describe how to create a smart contract for a webshop use case: getting offers from different suppliers for a specific order. I already know node.js so I will write the ChainCode in node. Note that go is also supported.

Prerequisites

  • A running instance of Oracle Blockchain Service
  • Node.js installed on your laptop
There are a number of steps involved in writing a smart contract (or chaincode).
  1. Design the chaincode
  2. Write a chaincode (in Node)
  3. Deploy a ChainCode to a Peer 
  4. Test the chaincode with Postman

Design 

Before you write a chaincode, you need to know what transactions need to be supported. In our example we have a webshop, that issues requests for shipping after ordering an item. Shippers can create an offer. If they are selected by the customer, they pickup the shipment. The customer receives the goods at the end of the cycle. For more information about designing the chaincode, see the hyperledger documentation


Write a ChainCode

The easiest way to write the chaincode is to download an example from the Oracle BlockChain Service and modify it.

  1. Navigate to the Blockchain console and click on Developers tools.
  2. Click on Download oracle samples
  3. Download the Cardealer sample and unzip it
  4. Navigate to [yourpath]\CarDealer\artifacts\src\github.com\node and copy cardealer_cc
  5. Paste the cardealer_cc in a new folder where you want to store your code and rename it to shipment_cc
  6. Leave the methods Init and Invoke as is and create methods to issue, offer, select, pickup and receive a shipment. 

        ---------------code snippet--------------------------------
        shipment.orderId = args[0];
        shipment.product = args[1].toLowerCase();
        shipment.customer = args[2].toLowerCase();
        shipment.shippingAddress = args[3];
        shipment.orderDate = parseInt(args[4]);
        if (typeof shipment.orderDate !== 'number') {
            throw new Error('5th argument must be a numeric string');
        }
        shipment.custodian = args[5].toLowerCase();
        shipment.currentState = shState.ISSUED;
        shipment.offers = [];

        // ==== Check if shipment already exists ====
        let shipmentAsBytes = await stub.getState(shipment.orderId);
        if (shipmentAsBytes.toString()) {
            console.info('This shipment already exists: ' + shipment.orderId);
            jsonResp.Error = 'This shipment already exists: ' + shipment.orderId;
            throw new Error(JSON.stringify(jsonResp));
        }

        // ==== Create shipment object and marshal to JSON ====
        let shipmentJSONasBytes = Buffer.from(JSON.stringify(shipment));

        // === Save shipment to state ===
        await stub.putState(shipment.orderId, shipmentJSONasBytes);


        -------------end code snippet --------------------------

Deploy the chaincode

After writing the chaincode, it needs to be deployed to the blockchain. In this example we will deploy it to the shipment channel using the quick start. This will instantiate it and use the default endorsement policy. Please note that channels and chaincodes can't be deleted after creating and deploying them.

  1. Zip the code and the package.json in a zip
  2. Click on "Deploy a new Chaincode" in the chaincode menu in the blockchain console.
  3. Click on Quick Deployment
  4. Fill out the right details


  5. Upload the zipfile and wait until the dialog shows that the chaincode is instantiated and deployed succesfully. 
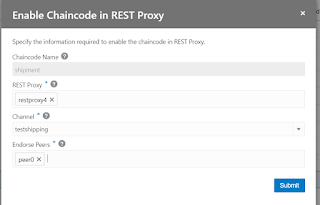
  6. Enable the rest proxy by going to the chaincode and clicking on the hamburger menu. Click on "Enable on REST Proxy". 
  7. Fill out the fields as shown in the figure below

Test the chaincode

Now that we have deployed the chaincode, we can test it using the REST proxy. Before you do this, make sure you have the right role associated with your user (RESTPROXY4_USER)
  1. Open postman
  2. Create a new "Post request" to issue a shipment
  3. Go to the blockchain console and find the URL that is listed for the RESTProxy that you enabled for your chaincode
  4. Create a request that looks as follows: 
curl -X POST \
      https://restserver:port/restproxy4/bcsgw/rest/v1/transaction/asyncInvocation \
        -H 'Authorization: Basic xxx' \
          -H 'Content-Type: application/json' \
            -H 'cache-control: no-cache' \
              -d '{
              "args":[1,"iron","John Doe","Rembrandtlaan 22c Bilthoven","0330","webshop"],
                "channel": "testshipping",
                  "chaincode": "shipment",
                    "chaincodeVer":"1.0",
                      "method": "issueShipment"
                        }'

                        The result should like this:


                        {
                            "returnCode": "Success",
                            "txid": "a4f5e851734f7e3ebdfa0761bfd54bab090cdaf08266363fe2451eacc3a14826"
                        }

                        Next steps

                        You can now query the result of this transaction, read the shipment etc.

                        Happy coding! 😃

                        Monday, January 21, 2019

                        Another blockchain: installing Ethereum on Oracle Cloud

                        After installing MultiChain on Oracle Compute Cloud, and playing around with HyperLedger on the Oracle Blockchain Cloud service, I now ran into a case where Ethereum was used.

                        This blog post describes how I installed a Ethereum node on Oracle Cloud Infrastructure.

                        Prerequisites

                        • An account on Oracle Cloud with Administrator rights
                        • You have generated an ssh key-pair
                        • You are logged in to your cloud account

                        Create Compartment

                        Create a compartment with the name Ethereum to separate this from your other infrastructure. You can find this under "Identity".

                        Create a Virtual Cloud Network

                        1. Navigate to Virtual Cloud Network, by selecting Network from the Menu
                        2. Select the compartment you just created
                        3. Click "Create Virtual Cloud Network"
                        • The compartment will default to the compartment you just selected
                        • Name: ethereum-network
                        • select "Create Virtual Cloud Network plus related resources" to quickly get up and running
                        • Click "Create"
                        A dialog is displayed that shows you what has been created, after a few seconds.

                        Create compute nodes

                        For this example I will create 3 nodes on 3 separate VMs.
                        1. Go to the Compute Menu
                        2. Select "Ethereum" in the compartment dropdown (left side of the menu)
                        3. Click Create Instance
                        4. Give the instance a name (ethereum-node1 for example)
                        5. Leave all the defaults for shape and OS
                        6. Upload your public key
                        7. Select the networking you created (ethereum-network)
                        8. Click "Create"
                        Repeat this process for 2 more nodes (giving them separate names of course).

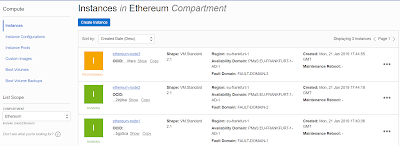
                        You should have three nodes now, like the picture below shows. It might take a couple of minutes before they are completely done, but not longer than 5 minutes.


                        You can connect to your instance as "opc" using the private key and the public IP address that is published in the console.

                        Install Ethereum

                        To install Ethereum for Oracle Enterprise Linux, you have to install it from source. There is no package available.

                        You need git, go and gcc. The easiest way is to install development tools

                        • sudo /usr/bin/ol_yum_configure.sh
                        • sudo yum update
                        • sudo yum groupinstall 'Development Tools'
                        • sudo yum install gettext-devel openssl-devel perl-CPAN perl-devel zlib-devel
                        • sudo yum install curl-devel

                        Install git

                        • sudo wget https://github.com/git/git/archive/v2.10.1.tar.gz -O git.tar.gz
                        • tar -zxf git.tar.gz
                        • cd git-2.10.1/
                        • make configure
                        • ./configure --prefix=/usr/local
                        • sudo make install
                        • git --version to check the installation

                        Install go

                        • cd ~
                        • wget https://dl.google.com/go/go1.11.4.linux-amd64.tar.gz
                        • sudo tar -C /usr/local -xzf go1.11.4.linux-amd64.tar.gz
                        • add go to your path by editing .bash_profile
                        • go version to check the installation

                        Install geth

                        To create the private network, we need to install geth, the command line tool that runs a ful Ethereum node implemented in Go. It offers three interfaces: 
                        1. the command line subcommands and options
                        2. a Json-rpc server
                        3. An interactive console
                        Execute the following commands
                        • cd ~
                        • git clone https://github.com/ethereum/go-ethereum
                        • cd go-ethereum
                        • make geth
                        • add build/bin to your path by editing your .bash_profile

                        Start the node

                        You can start a node by running build/bin/geth. This will add this node to the public ethereum network. This node is now part of the Ethereum network.


                        If you don't want to be part of the public network, you can also create a private network. https://github.com/ethereum/go-ethereum/wiki/Private-network.


                        Happy coding 😊

                        Monday, October 2, 2017

                        My First Blockchain in the Oracle Cloud

                        Being an integration person I am very interested in Blockchain architecture as an alternative for 'traditional' integration options like 'Enterprise SOA' and Centralized Master Data Management.

                        This blog will not discuss the architecture of blockchain, but describes how you can get started as a developer with blockchain using Oracle Cloud.

                        It assumes you have an instance of Oracle Compute Cloud at your disposal and describes how to get started wth MultiChain.

                        I executed the following steps:
                        1. Create two instances of Oracle Compute Cloud
                        2. Install MultiChain
                        3. Create the first chain

                        Create two instances of Oracle Compute Cloud

                        To show the concept of the block chain you need to create at least two nodes. In this case I created two instances of Oracle Compute Cloud Classic. 

                        1. Login to your identity domain: cloud.oracle.com
                        2. On the Dashboard, select "Create Instance" and pick "Compute Classic"
                        3. This gives you an overview as shown in the figure below. First you need to save the private key to be able to access the instance with ssh. 
                          1. Type a name for the key
                          2. Save it on your computer
                        4. Select "Customize"
                        5. Finish the Wizard
                          1. Select the image "OL_7.2_UEKR4_x86_64"
                          2. Select a general purpose shape, unless you are planning to build a real blockchain, then it is recommended to create a High Memory Shape
                          3. Add the key you saved to the instance, or upload your own key
                          4. For network leave the defaults
                          5. Leave defaults in the storage tab 
                        6. You can see the result in the orchestrations tab
                        Orchestration showing the instances that are created


                        In order to create a chain and have multiple nodes that are aware of each other, you need to make sure the instances can communicate.

                        To enable this, you need to add a Security Application and a Security Rule for the instances. (Many thanks to Simon Haslam who helped me figure this out!) :

                        1. Click on the Network tab in my instances
                        2. Select Shared Network
                        3. Select Security Application
                          1. Create a security Application for te default port
                            1. Name: TCP2671
                            2. Protocol: TCP
                            3. Port start: 2671
                            4. Port end: 2671
                            5. Description: default Multichain port
                          2. Create a security application for the RPC port
                            1. Name: TCP2670
                            2. Protocol: TCP
                            3. Port start: 2670
                            4. Port end: 2670
                            5. Description: default RPC multichain port
                        4. Select Security Rules
                        5. Click Add Security Rule
                        6. Fill in the fields
                          1. TCP2671 for security application
                          2. Source: security ip list (public-internet)
                          3. Destination: security list (default)
                        7. Add another security rule for the default RPC port
                          1. TCP2670 for security application
                          2. Source: security ip list (public-internet)
                          3. Destination: security list (default)


                        Now you are ready to create the second instance. Note that you don't have to set the security rules for new instances, because they are pointing to the default security list in this case. The new instances are added to that automatically. This is of course not something you would do in real life, but for My First Blockchain in the Oracle Cloud it works fine :) 


                        Install MultiChain

                        You need to install MultiChain on all your instances. 

                        To connect you need a ssh client. I am currently working on a Windows 10 machine, so I use PuTTY. The key that is downloaded from the cloud can't be used directly in PuTTY, you need to import it. 
                        1. Open PuTTYgen
                        2. Click import key
                        3. Browse to the key you just saved to your computer
                        4. Click on "Save Private Key"
                        5. Open PuTTY
                        6. Enter the details of the instance as shown below and save the session
                          1. Put in the public IP address of the instance
                          2. Point to the SSH private key in the Auth tab
                        7. Open a session
                        8. Install wget: sudo yum install wget -y
                        9. Run the following in the terminal:

                        cd /tmp
                        wget https://www.multichain.com/download/multichain-1.0.1.tar.gz
                        tar -xvzf multichain-1.0.1.tar.gz
                        cd multichain-1.0.1
                        sudo mv multichaind multichain-cli multichain-util /usr/local/bin
                        Repeat this for the second instance and if you are testing with more than one, for all the instances you want to include.

                        Creating my first chain

                        Now you are ready to start the tutorial to get acquainted with MultiChain.

                        In order to keep track of the different servers, I have given the nodes different colors in my PuTTY sessions.

                        1. Connect to node 1 and execute the commands that are referenced as 'server1'  in the tutorial in this window
                        2. Connect to node 2 and execute the commands that are references as 'server2' in the tutorial in this window
                        Note that I need to open two windows of PuTTY for server 2: One to start the node:

                        multichaind chain1@[ip-address]:[port]

                        And one to start the multichain-cli chain1 interaction. If you don't start the node, you will get an error:

                        MultiChain 1.0.1 RPC Client


                        Interactive mode
                        chain1: getinfo
                        error: couldn't connect to server
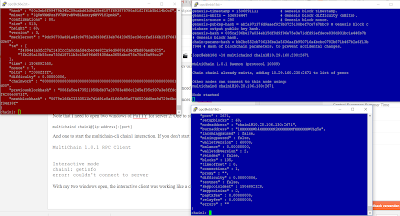
                        With my two windows open, the interactive client was working like a charm... 


                        Three windows testing MultiChain from my windows machine


                        Happy coding!