In the first blog about blockchain, I used Oracle Compute Cloud Classic and installed MultiChain on it. Since then, Oracle has released a Blockchain Cloud Service with a lot of out of the box functionality, based on Hyperledger.
In this blog post I will describe how to create a smart contract for a webshop use case: getting offers from different suppliers for a specific order. I already know node.js so I will write the ChainCode in node. Note that go is also supported.

Happy coding! 😃
In this blog post I will describe how to create a smart contract for a webshop use case: getting offers from different suppliers for a specific order. I already know node.js so I will write the ChainCode in node. Note that go is also supported.
Prerequisites
- A running instance of Oracle Blockchain Service
- Node.js installed on your laptop
There are a number of steps involved in writing a smart contract (or chaincode).
- Design the chaincode
- Write a chaincode (in Node)
- Deploy a ChainCode to a Peer
- Test the chaincode with Postman
Design
Before you write a chaincode, you need to know what transactions need to be supported. In our example we have a webshop, that issues requests for shipping after ordering an item. Shippers can create an offer. If they are selected by the customer, they pickup the shipment. The customer receives the goods at the end of the cycle. For more information about designing the chaincode, see the hyperledger documentation

Write a ChainCode
The easiest way to write the chaincode is to download an example from the Oracle BlockChain Service and modify it.
- Navigate to the Blockchain console and click on Developers tools.
- Click on Download oracle samples
- Download the Cardealer sample and unzip it
- Navigate to [yourpath]\CarDealer\artifacts\src\github.com\node and copy cardealer_cc
- Paste the cardealer_cc in a new folder where you want to store your code and rename it to shipment_cc
- Leave the methods Init and Invoke as is and create methods to issue, offer, select, pickup and receive a shipment.
---------------code snippet--------------------------------
shipment.orderId = args[0];
shipment.product = args[1].toLowerCase();
shipment.customer = args[2].toLowerCase();
shipment.shippingAddress = args[3];
shipment.orderDate = parseInt(args[4]);
if (typeof shipment.orderDate !== 'number') {
throw new Error('5th argument must be a numeric string');
}
shipment.custodian = args[5].toLowerCase();
shipment.currentState = shState.ISSUED;
shipment.offers = [];
// ==== Check if shipment already exists ====
let shipmentAsBytes = await stub.getState(shipment.orderId);
if (shipmentAsBytes.toString()) {
console.info('This shipment already exists: ' + shipment.orderId);
jsonResp.Error = 'This shipment already exists: ' + shipment.orderId;
throw new Error(JSON.stringify(jsonResp));
}
// ==== Create shipment object and marshal to JSON ====
let shipmentJSONasBytes = Buffer.from(JSON.stringify(shipment));
// === Save shipment to state ===
await stub.putState(shipment.orderId, shipmentJSONasBytes);
-------------end code snippet --------------------------
Deploy the chaincode
After writing the chaincode, it needs to be deployed to the blockchain. In this example we will deploy it to the shipment channel using the quick start. This will instantiate it and use the default endorsement policy. Please note that channels and chaincodes can't be deleted after creating and deploying them.
- Zip the code and the package.json in a zip
- Click on "Deploy a new Chaincode" in the chaincode menu in the blockchain console.
- Click on Quick Deployment
- Fill out the right details
- Upload the zipfile and wait until the dialog shows that the chaincode is instantiated and deployed succesfully.
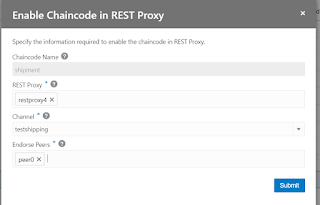
- Enable the rest proxy by going to the chaincode and clicking on the hamburger menu. Click on "Enable on REST Proxy".
- Fill out the fields as shown in the figure below


Test the chaincode
Now that we have deployed the chaincode, we can test it using the REST proxy. Before you do this, make sure you have the right role associated with your user (
RESTPROXY4_USER)- Open postman
- Create a new "Post request" to issue a shipment
- Go to the blockchain console and find the URL that is listed for the RESTProxy that you enabled for your chaincode
- Create a request that looks as follows:
The result should like this:
{
"returnCode": "Success",
"txid": "a4f5e851734f7e3ebdfa0761bfd54bab090cdaf08266363fe2451eacc3a14826"
}
Next steps
You can now query the result of this transaction, read the shipment etc.Happy coding! 😃